Intended audience: Students, Faculty, and Staff
Summary
The Panther Virtual Desktop Infrastructure (VDI) has been upgraded and is now called Panther Cloud. This new platform improves productivity, flexibility, and versatility for PVAMU users. The Virtual Desktop Interface enables access to virtualized remote desktops and applications through a single platform. The objective of this platform is to make applications that have traditionally only been available in department computer labs available anywhere, at any time, with an Internet connection, using any compatible device: PC, Mac, iOS, or Android.
Problem
Users may encounter issues when accessing or using the Panther Cloud. Common problems include difficulty logging in, slow performance, inability to access certain applications or files, and connection drops. These issues often occur due to unstable Internet connections, outdated software, incorrect login credentials, or browser cache and cookies interfering with the virtual desktop environment.
If these problems are not resolved, users may experience significant disruptions in their work or studies. Difficulty logging in can prevent access to essential resources, slow performance can hinder productivity, and inability to access applications or files can delay essential tasks. Connection drops can lead to loss of unsaved work and interruptions during critical activities
Solution
To resolve these issues, ensure you have a stable Internet connection. Verify your login credentials and update your VMware Horizon client to the latest version. Clear your browser's cache and cookies if accessing the virtual desktop through a web browser. Restarting your device can also help refresh your connection and resolve performance issues. By following these steps, you should be able to resolve most common issues with Panther Cloud.
Steps
To resolve these issues, follow the steps outlined below:
- Check Your Internet Connection: Ensure you have a stable Internet connection. If you are using Wi-Fi, try moving closer to the router or switching to a wired connection.
- Verify Your Credentials: Double-check that you are entering the correct user name and password. If you have forgotten your password, use the self-service portal to reset it.
- Update Your Software: Make sure you have the latest version of the VMware Horizon client installed. Updates often include performance improvements and bug fixes.
- Clear Cache and Cookies: Clear your browser's cache and cookies if you are accessing the virtual desktop through a web browser. This can resolve loading issues.
- Restart Your Device: Sometimes, simply restarting your device can resolve performance issues and refresh your connection.
- Contact Support: If you continue to experience issues, contact the IT support team for further assistance. Provide them with details about the problem and any error messages you have received.
Options for connecting to the Panther Cloud Virtual Desktop
—————————————————————————————————-
At present, you have two options for connecting to the virtual desktop environment.
OPTION 1 – HTML Web Access version – access Panther Virtual Desktop inside a web browser. Good for accessing from public devices where you cannot install the client software.
Secure access to the Home drive and applications from any computer with an Internet connection and a browser.
OPTION 2– Download the full-featured VMware Horizon Client – access Panther Virtual Desktop in a stand-alone client that will allow you to use your computer's peripherals (printer, scanners, external hard drive).
See the comparison and choose which client you prefer to use

Accessing the Panther Cloud Virtual Desktop via Web Browser (VMware Horizon HTML Access)
Follow these steps to access your Panther Virtual Desktop via your browser (Public Devices).
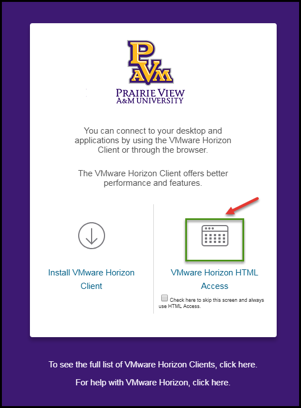
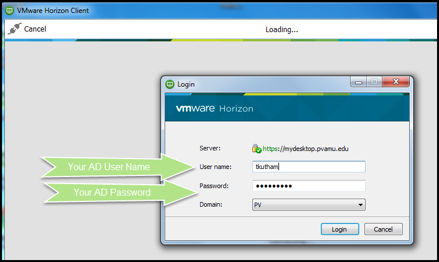
Open your Internet browser and type https://mydesktop.pvamu.edu in the address bar and press ENTER.
Click the VMware Horizon HTML Access shortcut/link.
Optional: If you always access through your browser, you can check the box to bypass this page.
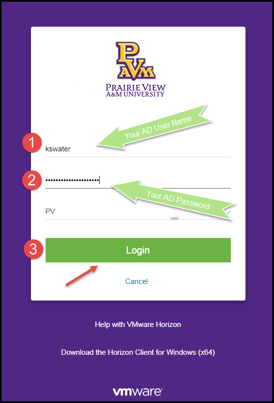
Enter your PVAMU AD Username and password.
Click the Login button
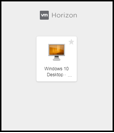
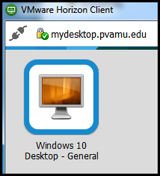
Click the available Panther Virtual Desktop
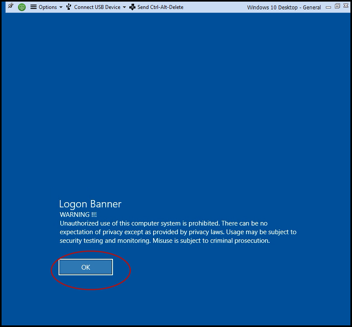
Click OK and launch the Windows desktop
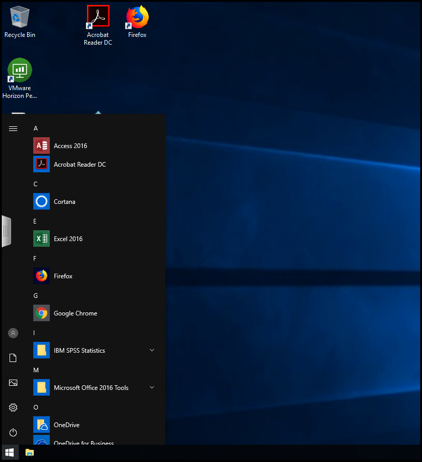
Click on the Start Menu button to see more options and available applications. It’s the Windows icon in the bottom left corner.
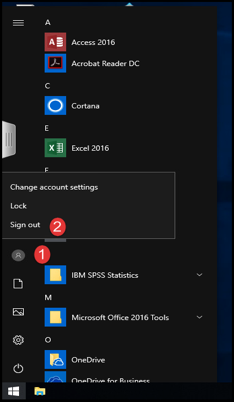
You should log out when you are ready to disconnect the Panther Virtual Desktop.
Click the user profile icon. A context menu will appear.
Click Sign out.
Installing the VMware Horizon Client and Accessing Panther Cloud Virtual Desktop (PC)
If you wish to download the client to your personal computer, follow these steps:
Open your Internet browser and type https://mydesktop.pvamu.edu in the address bar and press ENTER.
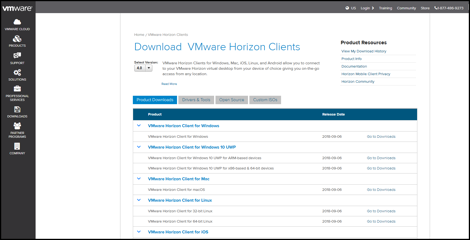
Click on “Install VMware Horizon View Client” (the left-hand option) to install the regular client on your machine.

If your machine’s type is recognized, it will suggest a file for download. Simply save the file it offers. If your machine’s type is not easily recognized, you might be presented with a menu of choices, like the one below. Choose the link to download a client appropriate for your system.
The remainder of this document is based on a 64-bit Windows client, however, the instructions will be similar for all platforms.
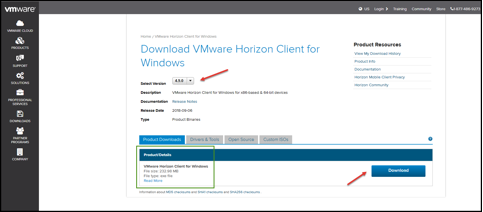
Read the Product Details, select the latest version from the drop-down, and click the “Download” button to the right.
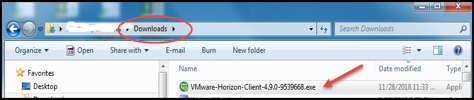
Save the file to your computer and make a note of the location of the downloaded file.
Browse to the file location on your computer and double-click the file.
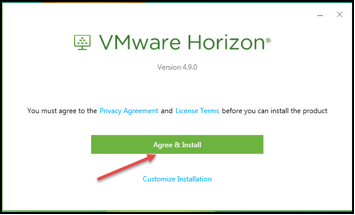
Click through the security prompts to run as an administrator.
Click “I Agree & Install”
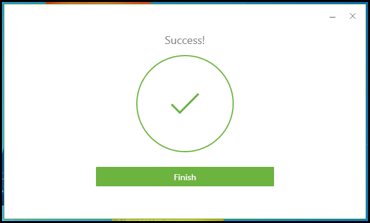
Click “Finish”
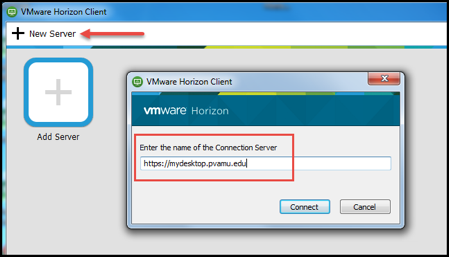
Launch the VMware Horizon client.

If this is a new installation, double-click the Add Server.
Type in https://Mydesktop.pvamu.edu and click ‘Connect.”
At the login screen, enter your PVAMU AD username and password
At the desktop selection screen, double-click on the icon for the desired desktop (the desktop options on this screen vary by user).
You are now connected to a Panther Cloud Virtual Desktop (VMware Horizon Desktop).
Click OK and launch the Windows Desktop.
Available Software
Adobe Reader, Adobe Flash Player, MS Office Suite 2016, Mozilla Firefox, Google Chrome, SPSS, Respondus LockDown Browse, etc.
Saving Files in Virtual Desktop
Each time you log in, a new virtual computer is built for you. All files are erased from the C:\ drive of a virtual desktop after each session terminates.
However, if you save documents in your Desktop and Documents, they will automatically be saved in the corresponding folders in your H:\ drive (home directory).
The path to the directories looks like :
- (\\pvfiler01\home$) (H:)
- >This PC > Documents
At present, this option is not available for saving Pictures, Music, or Video files.
How to Save Files Using a USB or Your Home Drive on the VDI
Accessing USB Devices and Optical Drives
USB storage devices (flash drives and DVD drives) are supported when using the Full-Feature Virtual Client and not supported when using a web browser (HTML Web Access).
Copying and Pasting
When using VMware Horizon Desktop Client, you can use traditional copy/paste functions between your computer and the Panther Virtual Desktop.
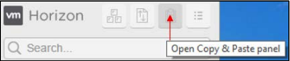
When using a web browser to access the Panther Virtual Desktop, the Copy & Paste panel must be used to transfer text to and from the Panther Virtual Desktop. Open the Horizon sidebar in your web browser by clicking on the tab.

The Copy & Paste panel is accessible from the sidebar.
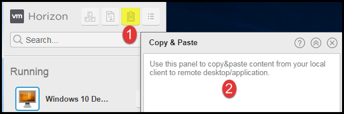
Clear the Copy & Paste panel every time you use this feature to make the Copy & Paste panel ready for the next use.

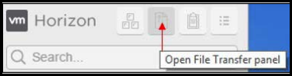
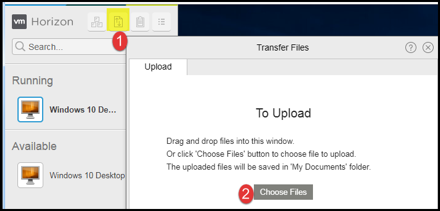
Transfer Files Using a Web Browser (HTML Web Access)
The File Transfer panel must be used to transfer files to and from the Panther Virtual Desktop. The File Transfer panel is accessible from the Horizon sidebar.
transfer
Printing
Printing is available when you are using the Full-Featured VMware Horizon Client. It allows you to print via a “pass-through” to printers installed on the host system.
Printing from a Web Browser (HTML Web Access) will be available soon.